
Smart Bell Timer is used to control an electrical bell or a Hooter so they ring or hoot at a predetermined time and duration. It is an all-electronic, digital timer with no external mechanical switches/buttons or controls. The Smart Bell timer can be accessed and configured/controlled from any smart phone or PC over its own wireless network (no WIFI connection required). Unlike any other School Bell timers on the market, this smart bell timer is secured with a unique password to prevent accidental or intentional unauthorized access. The smart bell features a user-friendly intuitive menu driven interface. This smart bell also has an Inbuilt UPS so the bell will ring even when the there is no external power supply. There is enough backup power for the bell or Hooter to operate normally for 24 hours without any external power supply.
The smart bell timer has three distinctive display sections: 1. primarily info-only display section (above the horizontal tab), 2. Smart bell control Tabs (horizontal tab) 3. Smart Bell settings control section (below the horizontal tab).
The smart bell can be accessed using a PC, Tablet, Mobile or any other device with access to a web browser using an inbuilt WIFI. You do not need an external WIFI connection or a data plan on your mobile to connect, program and control the smart bell timer. Settings such as device name (SSID), password, time zone can be changed as per user preference.
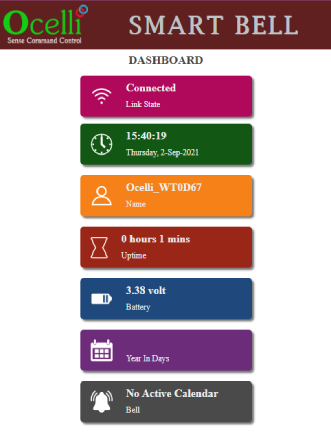
Info section displays the WIFI status, Current date and time, Name (SSID) of the device, Uptime since the last power up, Real Time Clock time, battery voltage, The duration of the programmed calendar (the number of days in the year that the program covers) and the time at which the next bell will ring in a given day unless it is an holiday in which case it shows as a holiday. These settings are updated once every 30 seconds. Date and time may not be correct when the device is powered up for the first time but will reflect the correct value after the first setup procedure. Date and Time is automatically updated whenever any settings of the device are changed. That means, there is no user action is needed to update the date or the time and these get updated along with other settings based on the phone or Tabs date and time without need for any user action.
Smart Bell timer supports up to Six different schedules, a holiday option and a manual mode catering to diverse user needs. It can also be programmed for the whole year once globally including Regular school day, Regular half day and Weekly holiday the following section describes each mode and its operation. Furthermore, each mode of operation is persistent which means that the smart bell retains its settings across power cycling.
Schedules
A schedule is a set of bell rings that are user defined and the following parameters are available to the user to program
3.2.1 Number of bells you want to ring on a given day, Ex. How may periods during a weekday
3.2.2 Time at which the bell needs to ring
3.2.3 Duration of the bell ring (max of 10 second a restriction by the electric bell manufacturers)
3.2.4 Number of times to repeat the bell (max of 10 times)
3.2.5 Number of different bells during a given day (Max 32 different times)
3.2.6 Six distinct schedules available with the above capabilities so each day of the week can be programmed with any one of these different schedules. The seventh option is for the weekly holiday. You can designate any day as a weekly holiday
3.2.7 A holiday option (not the weekly holiday) can also be used to designate any day of the week as a holiday and can be used as often as you want without any limits
So, in essence the customer can program a bell to ring up to 32 distinct times a day for a duration of 1-10 seconds and repeat each of these bells up to 10 times and have a choice of six different schedule so any given day can be programmed with any one of these six schedule and can designate any given day as a holiday without any restriction.
Calendar
The calendar is very flexible. You can program for a day or a week or a month or even an entire year at one go. There is no restriction what schedule to use on any given day you can designate any day as a holiday or a weekend without any restriction for the whole year in one go, no individual programming is required
Manual
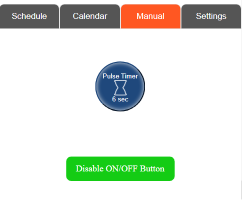
In this mode also called the Pulse timer mode, you can manually control the bell using your phone or a PC. In this mode of operation, the bell is turned ON manually but turned OFF automatically after the programmed time period.
Capacitive Touch ON/OFF button
Smart Bell Timer can be operated manually with the provided capacitive touch button. A short press switches the smart bell to manual mode and turns ON of load. The bell will ring as long as it has been set on the pulse timer mode
Three long touches of greater than 5 seconds will reset it back to the original factory setting (Username and password will be reset to the original factory setting). The schedule that has been done will not be lost during this reset but the calendar will be lost.
The following explains in detail how to program each of the different parameters of the smart bell
Connecting to the Timer

Programming a Schedule
Follow the instruction on your Mobile or PC
4.2.1 Log on to the smart bell on your phone or PC after selecting the smart bell WIFI signal and using the password as shown on the box
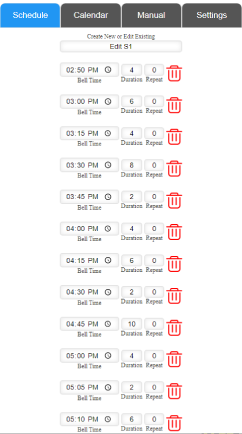
4.2.2 On the Phone or PC and underneath the dashboard you will see the following tabs Schedule, Calendar, Manual and Settings. Select Schedule
4.2.3 Under the tabs you will see a bar which has Edit S1 (it could be showing any one of these S1, S2….S6 after Edit)
4.2.4 Pick a Schedule in our case let it be S1. You can pick any from the drop-down menu that appears when you touch the Bar
4.2.5 Using drop down menus you can select the time when you want the bell to ring, Duration of the bell ring (max of 10 sec) and # of times you want the bell to repeat
4.2.6 To add the next time you want the bell to ring hit the + sign under the first schedule and it will display a second line for you need to complete the information for the second bell
4.2.7 You can repeat 4.2.5 and 4.2.6 and program all 32 distinct bells for any given schedule
4.2.8 You can repeat 4.2.4 thru 4.2.7 and program up to up to a maximum of six independent schedules
Manual (Pulse timer mode) Mode
In this mode, the pulse timer button controls the semi-automatic operational mode. The pulse timer button controls the on-demand/manual mode control of the bell. Tapping the button increments the duration of the bell from 1sec to 10 sec in 7 predetermined duration. For each tap, the timer value will cycle through 1sec, 2sec, 4sec, 6sec, 8sec and 10sec and then back to 1sec. Stopping at any particular value will be taken as the programmed value for the pulse timer and the connected load will turn ON in few seconds and turn OFF automatically after the programmed timer value. Caution: The School bell stays in manual mode as long as the external supply is uninterrupted. It reverts back to the previously set automatic mode when the power is lost and restored.
You can also manually ring the bell by pressing the eternal capacitive touch button for 1 second and it will ring the bell for the duration shown under as shown in pulse timer
To reactivate the school bell back to its automatic mode you need to press the save button under the calendar tab or the schedule tab once. This let the school bell know that it is no longer in the Manual mode and reverts back to the automatic mode where it will ring according to the programmed schedule
Settings
To access the smart bell and change the username or the password
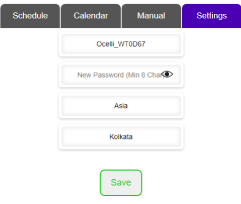
4.5.1 On the main menu touch the settings tab
4.5.2 The display shows the 4 lines, Device SSID, Password, Location, continent and the country (major city)
4.5.3 You can change any of these by just typing over the SSID and password, the continent and city can be selected using the drop-down menu
4.5.4 Hit the save button a new window opens up where you have to put in the old password and hit save again which will save the new SSID and password and the location information
4.5.5 With this the device will have a new SSID and the factory SSID will no longer be available and you will be logged off from your mobile or PC after 4.5.4
4.5.6 You need to log into the smart bell using the new SSID from now on as the factory issued SSID will no longer show up as one of the WIFI signal choices when you log on to the smart bell
4.5.6 If for some reason you loose your user name and password you can reset it to factory setting by pressing the capacitive touch manual button with 3 long presses (more than 5 sec each) and this will reset the smart bell to factory settings.
Specification
Parameter | Value |
Supply Voltage | Universal Input 85-220V+/-10% @50/60Hz |
Power Consumption | <1W |
ON duration in pulse mode | 1,2,3,4,6,8,10secs |
Clock Accuracy | ±2 sec/day |
Real Time Clock battery backup | 2 years |
switching Accuracy | ±1min |
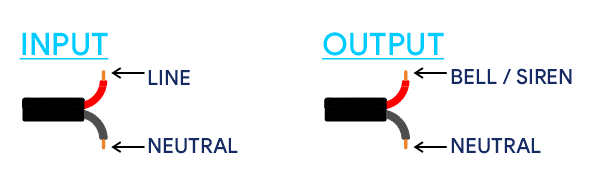
Relay Output | 1 N/O with 6A contact rating |
Operating Temperature | -10oC to 55oC |
Humidity Non Condensing) | 85% (RH) |
Load Status Indication | Web App – ICON and text status |
Dimension | 120x80x35mm |
Degree of Protection | Out door model – IP65 |
School Bell,
Any other application that needs bells at predefined schedule

TWELVE MONTHS warranty.
Legal Information:
The limited warranty period starts from the day the customer receives the product. Warranty of the product is limited to the manufacturing defects only and does not cover incorrect or improper usage. During the warranty period, we will replace or repair of the product if there is any manufacturing defect. To claim the warranty, the product has to be sent back to us. We may perform inspection or test to ascertain the causes of failures/defects, before replacing the unit.
Explore the transformative capabilities of automation with Ocelli’s all-encompassing services. Streamline operations, increase scalability, and drive growth with our tailored solutions designed to optimize your business processes.