
Smart Timer can be used to control any electrical appliances/loads in a predefined manner. It is an all-electronic, digital timer with no external mechanical switches/buttons or controls. The timer can be accessed and configured/controlled from any smart phone over its own wireless network (no WiFi connection required). Unlike any other timer in the market, each timer controller is secured with a unique password to prevent accidental or intentional unauthorized access. The timer features a user-friendly intuitive menu driven interface.

Smart timer supports many modes of operation to caters to diverse user needs. The following section describes each mode and its operation. Furthermore, each mode of operation is persistent which means that the timer retains its settings across power cycling.
2.1 Fully Automatic mode
In this mode, both ON and OFF event is automatic. There are two types of operation supported in this mode: Chronological (Crono) mode and manual mode.
2.1.1 Chronological mode
In this mode, the timer’s operation is based on one of the pre programmed schedules. The connected load will be turned ON at the scheduled ON time and turned OFF at the schedule OFF time on any and up to all days of the week. Also, this mode is the default mode of operation.
2.2 Pulse/Semi-Automatic mode
In this mode of operation, the load is turned ON manually but turned OFF automatically after the programmed time period. This time is programmable from 1 minute to 60 minutes in seven predetermined fixed duration.
2.3 On-Demand/Manual Mode
In the on-demand mode or manual mode of operation, both ON and OFF event is manual. Connected load can be turned ON and turned OFF at will.
2.4 Capacitive Touch ON/OFF button
Smart Timer can be operated manually with the provided capacitive touch button. A short press switches the timer to manual mode and turns ON/OFF of the load. Each press will toggle the load state.
A long touch of greater than 5 seconds will reset it back to the original factory setting (Username and password will be reset to the original factory setting)
The timer has three distinctive display sections: 1. primarily info-only display section (above the horizontal tab), 2. Timer mode control Tabs (horizontal tab) 3. Timer settings control section (below the horizontal tab).
Info section displays the Current date, Current time, Name (SSID) of the device, Uptime since the last power up, Real Time Clock, battery voltage, Device’s current operational mode (Crono or Pulse or Manual) and load status. These settings are updated in one-minute time interval. Date and time may not be correct when the device is powered up for the first time but will reflect the correct value after the first setup procedure. Date and Time is automatically updated whenever any settings of the device is changed. That means, there is no user action is needed to update the date or the time and these get updated along with other settings based on the smartphone/Tabs date and time without need for any user action.
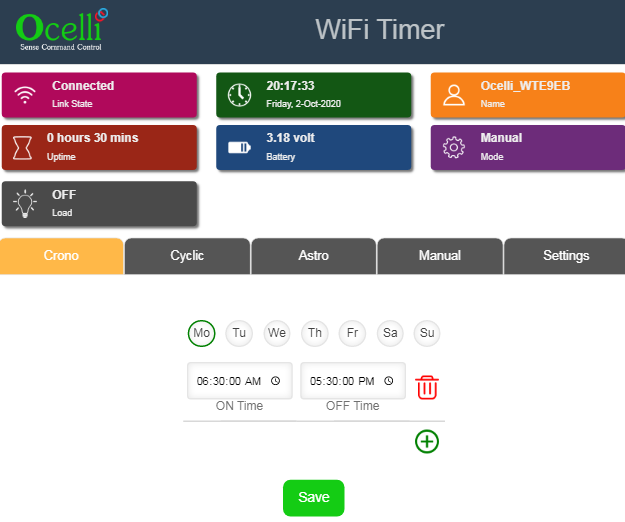
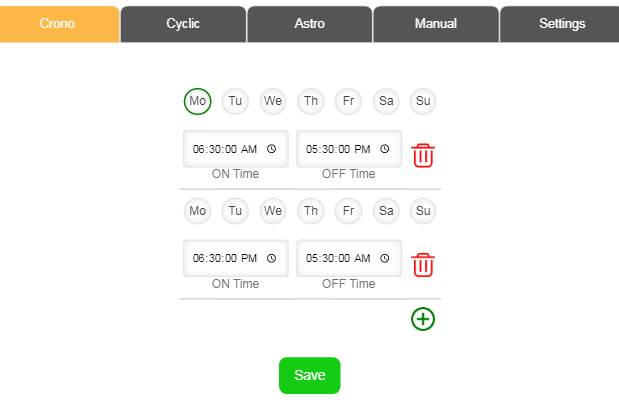
3.1 Chronological Timer (Crono Tab) Mode
In this mode, the timer schedule can be programmed using buttons and text boxes. The timer can have maximum of 16 schedules with week day selection and ON/OFF time selection for each of these. Clicking the Plus (+) button adds a new schedule and clicking the recycle button deletes a schedule. Once all the sixteen schedules are added the plus button will no longer be visible.
3.2 Semi-Automatic/Manual (Manual Tab) Mode
Semi-automatic and manual modes operation is grouped under Manual timer mode.
In this mode, there are two buttons that controls manual and semi-automatic operational modes. The first button controls the on-demand/manual mode control of the device. Tapping the button toggles, the current status of the device from ON-to-OFF and vice versa. Second button controls the pulse mode timer value. For each tap, the timer value will cycle through 1m, 5m, 10m, 15m, 30m 45m and 60m and then back to 1m. Stopping at any particular value will be taken as programmed value for the pulse timer and the connected load will turn ON in few seconds and turn OFF automatically after the programmed timer value.
There is a toggle switch Permanent Override / Temporary override whose function and condition of use is as explained below
When using the device as a Crono timer and for some reason you want to halt the the timer you can do this by going to the manual Tab and pressing the manual button. This stops the timer by putting it in the manual mode.
Now the future behavior is as follows
Under Permanent Override
The timer stays in manual mode permanently
To reactivate the timer back to it’s automatic mode you need to again save the setting in either Crono mode
Under Temporary Override
The timer stays in manual mode as long as the external supply is uninterrupted. It reverts back to the previously set automatic mode when the power is lost and restored

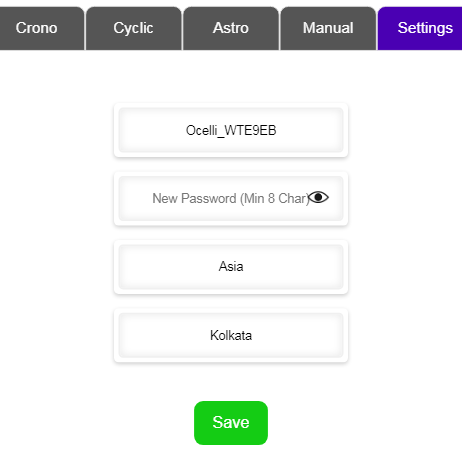
Timer settings such as device name (SSID), password, time zone can be changed as per user preference. These settings are under settings tab. To change any of these values, type in the new value and save. When save button is pressed, device will prompt for current password. To keep any setting, leave that particular field blank. A long press (more than 5 sec) of the capacitive touch manual button will reset the timer to factory settings.
|
Parameter |
Value |
|
Supply Voltage |
Universal Input 85-220V+/-10% @50/60Hz |
|
Power Consumption |
<1W |
|
Minimum switching time |
1min |
|
ON duration in pulse mode |
1, 5, 10, 15, 30, 4 and 60min |
|
Clock Accuracy |
±2 sec/day |
|
Real Time Clock battery backup |
2 years |
|
Switching Accuracy |
±1min |
|
Relay Output |
1 N/O with 6A contact rating |
|
Operating Temperature |
-10oC to 55oC |
|
Humidity Non Condensing) |
85% (RH) |
|
Load Status Indication |
Web App – ICON and text status |
|
Dimension |
105x38x30mm |
|
Degree of Protection |
Ip 66 |
Garden/Street/Staircase/Parking/Portico/Hoarding Lights
Pumps/Sprinkler
Advertising Displays/Glow signs.
Air conditioner/Cooler, Geyser, conveyor
Siren, Bell applications
Any other application that needs predefined schedule
Power up the device.
Go to WIFI Settings on your smartphone.
Connect to the device with the unique password printed on the box
Open the web browser and navigate to 192.168.4.1
To change the Crono mode settings:
Select the required week days in which the connected device needs to be turned ON.
Tap on the ON Time value to change the ON time and set the appropriate ON time.
Tap on the OFF time value to change the OFF time and set the appropriate OFF time.
To change the on-demand mode/manual mode settings:
Tap on the load menu item under pulse timer tab. For each tap the load status will keep toggling
To change the pulse timer mode / semi-automatic mode settings:
Tap on the pulse mode button under pulse timer tab. For each tap, the timer value will cycle through the following values: 1min, 5min, 10min, 15min, 30min, 45min and 60min. Stop tapping, when the desired value is displayed, the load will turn ON in few seconds and will turn OFF automatically after the specified time interval.
TWELVE MONTHS warranty.
Legal Information:
The limited warranty period starts from the day the customer receives the product. Warranty of the product is limited to the manufacturing defects only and does not cover incorrect or improper usage. During the warranty period, we will replace or repair of the product if there is any manufacturing defect. To claim the warranty, the product has to be sent back to us. We may perform inspection or test to ascertain the causes of failures/defects, before replacing the unit.
Explore the transformative capabilities of automation with Ocelli’s all-encompassing services. Streamline operations, increase scalability, and drive growth with our tailored solutions designed to optimize your business processes.